Disclaimer: I am not very good at explaining things through typing. If you have a question about this or I lose you along the way, feel free to contact me for more info. This was just a quick demo and shouldn't be used as rock solid data.
I have been lusting over kodak's vision 3 (7219/5219) stocks for a while. I haven't be able to use them yet- Well, I never really get to shoot film anyways... but I do have a planned affair with 7219 in a few weeks at my own expense!- more on that later.
There is something so pretty about how film handles highlights, you have so much over-exposure room it is ridiculous when compared to digital image acquisitions. So you might ask yourself... how can I get my camera to respond to more like film and less like digital camera? As a Red camera owner, I have been trying to answer that question for about 5 months, sure you get the resolution and depth of field of 35-mm film, but the images that come out of the camera have been so clean and well... video like? (can I say that?) Its not really a bad thing and there are many circumstances where I can see that would be a preference, but for now, I am looking for the look and feel of film and I think I am getting closer.
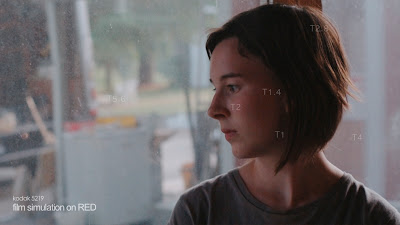
First let me show some of Kodak's 5219 so we can get a feel for how a cutting edge fast film-stock responds to light (image and exposure data from kodak):

Here are exposure references to a few numbers on the picture:
Highlights:
8. +7 stops over exposure
7. +6 stops over exposure
6. +4 stops over exposure
5. +2 stops over exposure
and
Shadow:
2. -2.5 stops under
From this information, its a safe bet to say that kodak 5219/7219 has about -3 stops under to black and +7 stops over to white. (Im sure it has more range than that- just being safe!) Notice how much room for over-exposure there is, you can see plenty of detail outside- however the shadows go to black more quickly.
This is almost opposite for a Red camera:
With base settings (asa320) you get maybe 2 to 3 stops over exposure and... IMMEDIATELY clip to white(like most digital cameras). But something great about it is that the Red can see very deep into the shadows and still be relatively clean when compared to underexposed film. Because the asa on the Red means almost nothing at all (its all Raw data), you have the ability to "place" your exposure (18% grey) anywhere in the index you want.
Let me try to demonstrate this, and attempt to show how you can get more of a 5219 response from your camera:
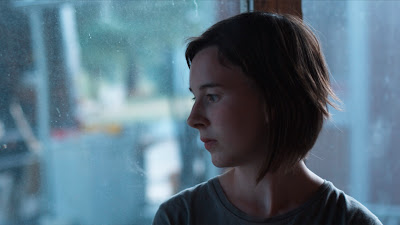
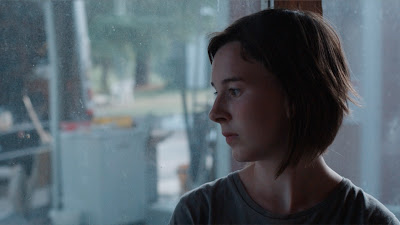
First I am going to show you an image I took with a Red camera of my lovely wife:
(ASA320, 23.98fps, 180 shutter, face at T2, camera at T2- all base setting with Redspace gamma- no adjustments)
.jpg)
.jpg)
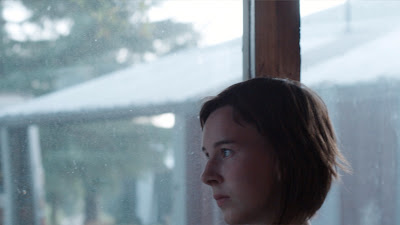
This is all from the same take, I just panned up to look out side more.
See all those highlight burn to white outside? Look at the roof (T11-16) It is completely clipped, even the driveway (T5.6) in the back ground is clipping. While this image is clean and sharp (and has a film like depth of field)- It looks nothing like film to me...
Back to what I said about asa and putting 18% grey where you want. What if I could utilize those many available stops in the shadows- for instance the 2.5 stops closest to the noise floor, and place them in the highlights instead?
Here is where it might get confusing:
So if I rated the camera at 2.5 stops faster- essentially underexposing the sensor by almost 2.5 stops (because its a native asa320 sensor), that means I would gained 2.5 stops in the highlights. So now all of a sudden my 2-3 stops over exposure latitude just turned into almost more than +5. So now, If I shoot that same scene with my wife but trade range in the shadow for range in the highlights- I just might be able to get a more film like response to the highlights in this high-contrast scene.
Here is the same scene as above but a moment later with the camera rated at 2.5 stops faster and the stop adjusted to match the readings on Marika's face (processed with Redlog and adjusted curve to match exposure):


How is that for a comparison of the above shots? I shot it just seconds later from the ones above. Look at the roof- yes there it actually a roof there now and you can see it! This is a huge improvement on a high-contrast scene by exposing this way.
I can hear you now, "I dont want to rate my camera for that fast- thats crazy!". Stop right there... forget about what the Red says asa is, it doesn't translate for this exercise.. its just how you meter the scene! I actually left the camera at asa320 both in camera and in redalert for post processing ; )
Here is the final product with the finishing touches of a boost of red (like 5219) and grain to compensate for grainy-er blacks and a little s-curve.
With motion tracked Stop overlays so you can see what the scene was reading at asa 320:
Pretending to shoot kodak 5219 (with T-stop overlays) from Hunter Richards on Vimeo.
Clean with no stop overlays:
Kodak 5219 look on Red (no T-stop overlays) from Hunter Richards on Vimeo.
Back to what I said, this is "trading" stops. Some bad things from this would be noisier shadows, personally in a high-contrast scene I will take noisier shadows for more headroom in the highlights.
I would probably do this for 1080p output, defiantly for 720p and maybe even more extreme underexposure for Standard definition. If your screening 4K or 2K, I would rate the camera at only a stop faster (asa640) to get some benefit of this but not have too much grain in your shadows.
Next time I will try rating the camera for 2 stops faster and try to find the perfect compromise between highlights and shadows.
And for the final sad news: If you really want the film-look, you have to shoot film! ; )
4 comments:
I loved the test man!
It wasn't pretty clear what ASA did you rate the RED One for...
Or, did you actually change the ASA on RED or you used a light meter for ASAXXX???
Thanks.
This is a cool video, first and foremost.
I'd like to see if your "Double Polarizer" works even more magic on that roof.
great article.
In my first three weeks with our Red I have not concerned myself with ASA at all - I expose by looking at the histogram in raw mode. I feel that way I can make a fair judgement as to where to expose - and where to sacrifice. I tend to rather err on a bit of extra noise rather than larger areas of 108 IRE.
But my learnng has only begun...
And your wife has definately film qualities ;)
Sorry I wasn't very specific on the ASA. So asa320 x 2 = asa640 (1-stop) asa640 x 2 = asa1280 (another 1-stop) and asa1280 + asa640 = ~asa2000 (another 1/2 stop)
Actually I was a little under 2.5 stops so it was more like asa1500 for this test. Things I have noticed after more trial and eeror when doing this stuff is that the Red (and all digital sensors) need to reach a certain saturation point or else your basically interpolating color information when increasing saturation in post (because this method lowers saturation along with exposure).
After much thought I found it to be better 95% of the time to rate the camera at around asa500 UNLESS you are shooting under high contrast situations- It just gets too noisy in the shadows for most peoples tastes.
Anyways thanks for the comments!
Post a Comment